Monday, March 27, 2023

Fête Gazette and Central Kentucky Home & Garden Show


Hello friends!  I honestly have no idea if people read blogs these days, but I like to pop in once in a while to update my portfolio, and to say hi!  So, if you happen to read this, I hope you're doing well and I would love to hear from you!  For an update on my end, I met Amy at the fall market held at Manchester Music Hall here in Lexington.  We immediately bonded over our love of fun party decor, quirky items, and 80s childhood memorabilia, and I took her business card with plans to reach out.  We met for coffee, (it was my first time at Brevede, and I highly recommend the place), and Amy sold a few of my handmade items at some of her Christmas markets and events.  We had snowball piñatas, beautiful bells, and some sweet treats.  

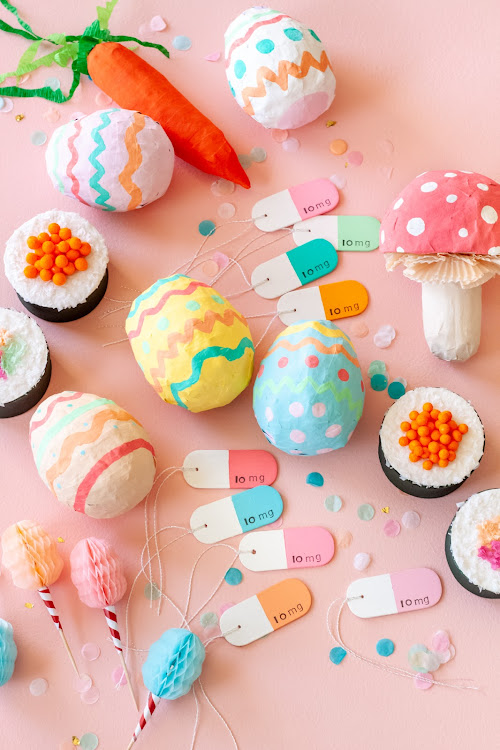
I have currently been working on some springtime goodies for the Central Kentucky Home & Garden Show where Amy will be selling this weekend.  If you are in Lexington, buy your tickets now, and be sure to check out the PK's Gift Closet booth for some really unique gifts and products including some of my handmade party supplies.  We are also working on a really fun backdrop, so be sure to stop by and take some pics!  


So, these are Easter Egg piñatas filled with fun treats.  You can stick them in a basket, or send the kiddos on a hunt.  Either way, this could be a really unique addition to your Easter gifting.  


If you plan to host any parties this Spring, you'll definitely want to pick up some cotton candy cupcake toppers!  They come in a set of three - pink, light blue, and peach.  I designed them for county fair, carnival, circus or candy themes, and I am sure there are a lot of other ideas for cotton candy!  How do you envision using them?
    

I thought some wooden pill gift tags would be adorable on any "get well soon" present, and I believe these will be attached to the cutest gift baskets that Amy is pulling together.


These handmade sushi roll gift boxes will be sold in sets of three, and they're really cute in real life!  


In the first photo, I shared the mushroom and carrot piñatas I designed.  Unfortunately, the mushroom was especially time-consuming, so it will not be available for sale.  Neither will the carrot, but I wanted to share anyway because I love how they turned out!  I wish they were easier to whip up, because I would love to see them used for a party.  I'm afraid I will not be offering shipping at the moment, so I really hope to see you at the show!  Happy Spring!!  

Saturday, December 10, 2022

No-Bake Stocking Cookies


These no-bake stocking cookies are a fun little Christmas treat to add to your cookie making this year!  You can find the full tutorial at Handmade Charlotte.  Merry baking!  (...or no-baking!)

Tuesday, November 22, 2022

Candy Calico Corn

Ahhh, can you believe this is Thanksgiving week?  If I’m honest, I started listening to Christmas music on November 1st, but there is so much to be grateful for this year, and sometimes I forget to stop and reflect on all the good things.  I am beyond grateful for strong friendships.  At twenty-four years old, I remember worrying about choosing the right bridesmaids.  I wanted to pick friends who would still be in my life in twenty years, and I’m happy to say that the friends I chose are my closest friends to this day!  I talk to a couple of them almost daily, and treasure them even more today than I did 20+ years ago.  We have walked through many seasons of life together (good & bad), and it feels like I wouldn’t have survived some of them without these ladies by my side.  I didn’t mean for this post to turn into a tribute to girlfriends, but I’m just SO grateful for them, and I hope they know it!  I treasure the new friends I have made along the way as well.  What are you most grateful for this year?


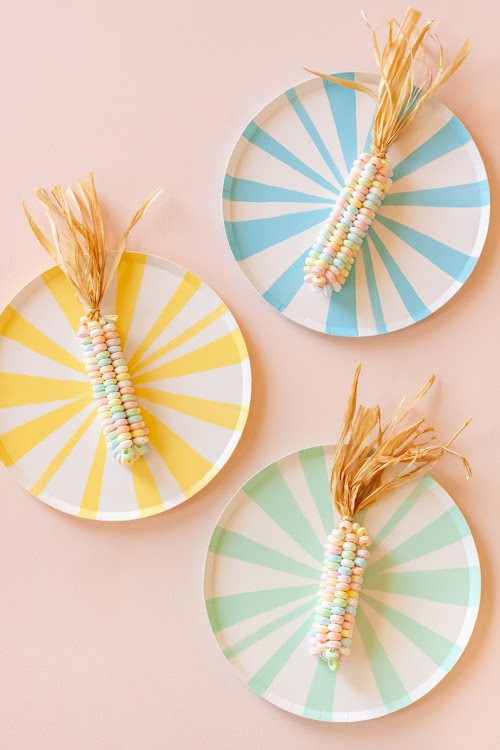
I wanted to share this pastel calico corn I made using candy bracelets for a fun little Thanksgiving DIY for the kids.  They’re so easy to pull together once you have the supplies, that I made five of ‘em while watching a few episodes on Netflix!  I hope you have a wonderful Thanksgiving and that you are able to take time to relax and reflect.  Here’s a little tutorial for the calico corn!


WHAT YOU NEED:

Candy Necklaces

18 Gauge Wire

Natural Raffia

Natural Jute Twine

Scissors

HOW TO:

Step 1

Cut the candy beads off the necklaces, and place in a bowl. 

Step 2

Cut about a 12 inch piece of wire, and bend in half.  String the candy beads onto the wire, leaving about 1 1/2 inches at the top on each side. 

Step 3

Carefully hold the wire together at the top to keep the beads in place, while wrapping a second wire around the center of the first.  Make the second wire slightly longer than 12 inches, since it will lose length when you wrap it around the first.  Add candy beads to the second wire leaving space at the top again.

Step 4

Repeat the steps with one more wire, until you have six pieces of wire sticking up.  Twist the 6 wire ends together at the top, and fold over to keep any loose ends from poking anyone. 

Step 5

Cut a small bundle of raffia to about 4 1/2 inches long, and use a short piece of hemp string to tie it around the wires at the top of the “corn”.  You may cut the string down if it hangs too much. 

TIP:  Be sure to help younger kids untwist the wires, and release the candy for them. 


Happy crafting and Happy Thanksgiving!

Monday, October 17, 2022

Crystal Ball Halloween Favors


Fill these crystal ball favors with Halloween candy, and share with friends, neighbors, or party guests.  Find the full tutorial at Handmade Charlotte.  

Confetti Club : Happy Mail


Hello confetti lovers!  If you're new to Confetti Club, be sure to check out the intro post here.  I just wanted to follow up with a tiny tip for mailing your contributions.  People love to get personal mail no matter what, but it's even MORE fun when the packaging is pretty, right?!  

When you divide your confetti for sending to club members, I recommend some clear cellophane bags that you can fold over a couple times at the top, or you could get the kind that zip.  Seal them with some fun Washi tape or stickers.  There are a bunch of fun options on Etsy!  

Lastly, if you have a label maker, you could personalize each bag with members' names.  I bought some pink tape on Amazon.  Obviously, embellishments are not necessary - just fun!

The best thing about Confetti Club is that you can just stick it in an envelope - no box or post office necessary!     


If you start your own Confetti Club, be sure to share pics of your mixes, and tag @fetegazette on Instagram or Facebook.  I would LOVE to see what you come up with and share inspiration.  Let's use #fgconfetticlub and spread the word!

Wednesday, September 28, 2022

Confetti Club : Intro & Inspo


Welcome to Confetti Club!  I don't know about you, but every time I receive a package in the mail, it really makes my day...especially when it's something I ordered from a party shop.  I literally feel like a kid on Christmas morning!  One of my favorite items to use for special occassions, parties, or photos is definitely CONFETTI.

Currently, my favorite tissue confetti has to be anything Studio Pep, and most of the online party shops carry a few mixes.  While I adore the confetti alone, I started adding a few pinches of extra confetti, glitter and mylar to personalize it for specific holidays or themes. 

I started thinking, "how fun would it be to get some friends in on collecting items for confetti mixes, and everybody gets to give and receive some HAPPY MAIL?!"  I mean, this could become a monthly thing...or quarterly??  You could just do it for all the major holidays, or include seasons, birthdays, and other relevant events.  Most of my mixes use about four different items, so invite three friends to join your club.

To get started...

1.  Decide how often your members will create mixes.  You may need a President to send reminders each month or quarter!

2.  Choose your first theme and/or color scheme, and assign confetti / glitter types, or you could take a chance and just see what each person contributes.  

NOTE:  I would recommend taking turns purchasing the different types of glitter and confetti, since the cost may vary.  Once you have a nice collection of mylar and stars, you can all just focus on theme-specific additions.  

3.  Decide on a date for each member to agree to have their contributions in the mail.  

4.  Each member will purchase an item for the mix, and divide it into four (or the number of club members).  Package each pile, and send it along to all members.  (More on this in the next post...)

5.  Wait to receive a variety of items from other members, and then combine for a fun confetti mix!

Another idea is to have each member get their own "starter kit", including gold, silver and iridescent mylar, as well as silver and gold star confetti.  Then, happy mail can just include tissue confetti, glitter, and other shapes depending on the holiday or season.       


SPOOKY MIX
bat glitter (similar item)


HAPPY MIX


DAYDREAM MIX
heart shaped confetti (similar item)


UNICORN MIX

If you start your own Confetti Club, be sure to share pics of your mixes, and tag @fetegazette on Instagram or Facebook.  I would LOVE to see what you come up with and share inspiration.  Let's use #fgconfetticlub and spread the word!

Monday, September 19, 2022

Halloween Moon Pouch Favors

These moon pouches are a simple, paper plate DIY for a fun Halloween craft, class party, or cute favor, and you could even use these Oh Happy Day plates if you want to skip the painting!  Find the full tutorial here.  Happy Halloween!  

Thursday, September 15, 2022

Shop Local - Asian Market

Have you found your local Asian market?  It is seriously the best place to find fun (and adorable) candy, drinks, paper goods, dishes, bento boxes, etc.  We are also a huge fan of bulgogi, kimchi, Thai tea, and wasabi peas.  Mmmm, my mouth is watering just thinking about it!  I would highly recommend Dong Yang Market if you're in the Lexington, Kentucky area, and if not, you should definitely find your local shop and check it out!  The candy would be perfect in favor bags, and there are several other items I would use for a party.     


You may be able to find similar products online, and some are very reasonably priced, but I have found that shopping in person is definitely easier on the budget!  I am linking a few items from the photos below so you can watch for them at your local store.  What is the best thing you have discovered at an Asian market?  


Wednesday, August 24, 2022

DIY Back-to-School Cupcake Toppers


Are your kiddos back in school?  It's never too late to celebrate with a few friends, cupcakes, and a quick DIY!  These pencils and apple cores are made from mini honeycomb balls found at Oh Happy Day, and they could also be fun for teacher appreciation or graduation.  Here's the link for my LTK shop, where you will find all the supplies you need to make these cuties.  Happy Back-to-School!  

Monday, August 8, 2022

Backpack Piñata for Back-to-School


Happy back-to-school, friends!  I just wanted to share this Kanken backpack piñata I made over the weekend.  I thought of these a while back, and wasn't sure I was going to be able to pull it off in time.  So glad I did, because it's so fun to gift some back-to-school supplies and treats on the first day of school.    

We go back Wednesday, and I have a Senior in High School, and a 6th grader.  Big year here!  I saw a girl graduate on tv yesterday, and it made me bawl my eyes out.  Any tips for surviving the last year, Moms?  What grades are your kiddos entering?  

Wishing everyone a great week, whether you're returning to school, or wrapping up summer break!

PS I couldn't decide between the mint green and white background, so I'm sharing both.  :) 

Saturday, June 25, 2022

Maker Ribbons & TO MAKE by Danielle Davis

TO MAKE is my new favorite book, with beautiful words by Danielle Davis, and gorgeous pictures by Mags DeRoma.  Although it is technically a picture book for kids, I could relate so well to the process of making that Danielle describes in the book.  To make anything, you have to gather, make, then wait.  That is pretty much what we do each time we come up with an idea.  We run to the store (or craft stash) to gather supplies, make the project (sometimes more than once!), and then wait.  When I make piñatas, I have to wait a long time for the paper mache to dry before I can paint, or sometimes I am waiting for a project to be published on another site.          


It is so fun to think about what it is that you like to make, and realize that it likely follows the three steps above!  The illustrations are so beautiful, imaginative, and inspiring, and I found myself getting lost in daydreams about making.  I love when a book or movie takes my brain to a creative place, and I am inspired to think of new ideas. That is exactly what TO MAKE did for me, so I can only imagine how inspiring the book will be to the creative minds of children.  Sometimes creativity requires thinking like a child, and a good book like this can help the adult brain get to the right state of mind.


When Danielle reached out a few months ago about collaborating on a project to go along with this beautiful book, I was so honored, and knew immediately that I wanted to participate.  When I got a sneak peak of the book, I was even more excited to work with Danielle.  Also, she is so sweet, genuine, and in the words of Anne of Green Gables, felt like a kindred spirit!  


We came up with these maker ribbons for kids to wear, hang, or display, and each ribbon involves the making process from activities in the book.  Kids can get creative and come up with their own ribbons for whatever it is that they like to make.  We hope these will inspire their imagination and creative juices!  You can find the tutorial on Danielle's website, HERE.  You will definitely want to grab a copy of the book for your personal library, or as a gift for a friend.  Happy making!

Wednesday, May 4, 2022

DIY Mini Stick Horse Piñata


It's Derby week here in Kentucky, and it's time to make some stick horse piñatas!  These are perfect favors for the kiddos, and you could even have a fun little race with them!  They could work for a pony party as well.  You can find the tutorial here, in the Handmade Charlotte archives.  

Friday, April 29, 2022

DIY Oh Happy Day Plate Backdrop

Happy Friday!  If you have some leftover Oh Happy Day Plates lying around, throw a party with this fun DIY backdrop.  I love finding simple ways to cover a large area in pattern and/or color, without breaking the bank.  This one can be done in any color scheme...like, how about red, white, and blue for Memorial Day or 4th of July?  Throw a little pink in there too!  Pink is the new neutral!  If you create this wall, I would love to see it, so be sure to share.  If you would like to receive 10% off your Oh Happy Day purchase, use code ABIGAIL41680.  Enjoy your weekend! xo


SUPPLIES

Oh Happy Day Plates (Rose, Neon Rose, Coral, Neon Coral, Happy)


Pencil


OH HAPPY DAY! shop has beautiful party cups and napkins to coordinate with your backdrop colors. Don't forget to use code ABIGAIL41680 for 10% off your purchase.     

Wednesday, April 20, 2022

Earth Day Globe Favors


Do you celebrate Earth Day?  It's on April 22, and if I'm honest, I don't usually do anything - but this year, I think I will be sharing these globe containers I made for Valentine's Day!  They're perfect for both occasions.  You can find the tutorial here, and I will link the supplies below.

Plastic Ball Containers

Plastic Wine Glass Base

Silver Spray Paint

Colored Spray Paint

Silver Pipe Cleaners

Adhesive Vinyl Sheet

Cricut Cutting Machine

If you have any questions about the tutorial, feel free to leave a comment.  Happy Earth Day!

NOTE:  I may make a small commission if you purchase from the links - so thank youuuu!

Saturday, April 16, 2022

DIY Honeycomb Flowers


Happy Easter friends!!  I can't believe that it's tomorrow already.  We haven't even decorated eggs yet!  I have gathered everything for Easter baskets though.  How will you be celebrating?  You can make these DIY honeycomb flowers with mini honeycomb balls and a glue gun.  I will link the supplies below.  In full disclosure, I may make a small commission if you shop my links.  Thank youuuu!  :)  


Create this look:

If you have any questions about making the honeycomb flowers, feel free to comment below.  Happy Easter!